 how-to
Can You Install a Fence on a Slope? A 2026 How-To Guide
Table of Contents
- Racked vs Stepped Fence: Which Method Fits Your Yard?
- How to Assess Slope Angle and Grade Before You Dig
- Tools, Materials, and Layout for Building a Fence on a Slope
- Fence Post Depth on Hills: Why Deeper Footings Matter
- Preventing Gaps Under a Fence on a Slope
- Step-by-Step Installation: Setting Posts and Panels on a Slope
- Drainage, Erosion Control, and Long-Term Maintenance for Sloped Fences
- Conclusion
- Frequently Asked Questions
Last Updated: September 14, 2026
Racked vs Stepped Fence: Which Method Fits Your Yard?
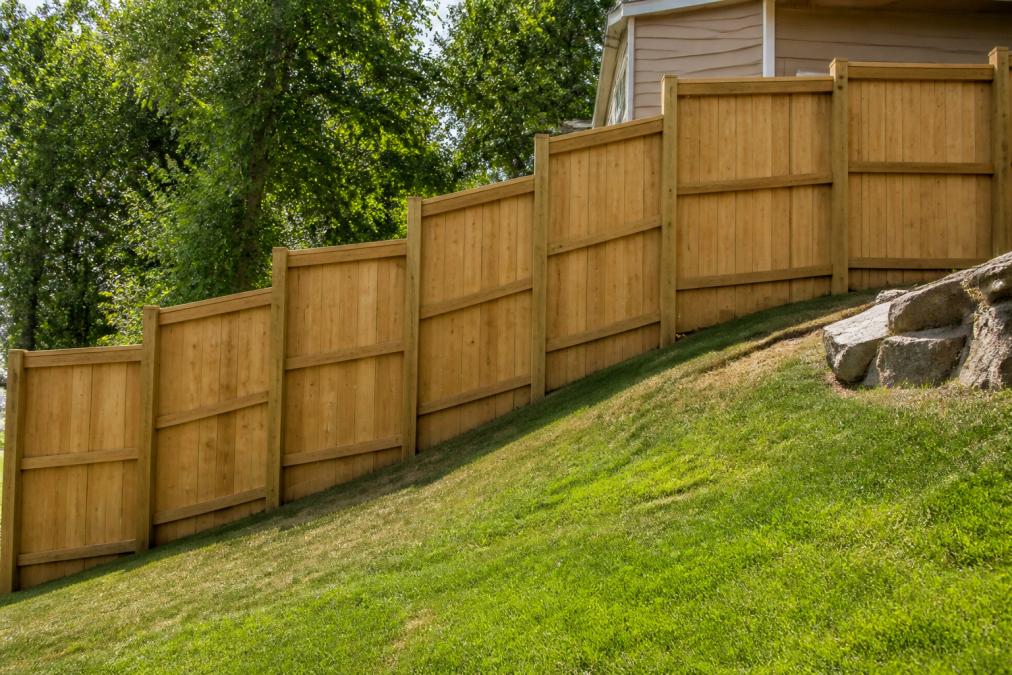
Yes, you can install a fence on a slope, and the method you choose determines how it looks, holds up, and costs. A racked fence follows the ground's contour with panels that angle to match the grade; a stepped fence keeps every panel level and drops in stair-step fashion. Racked suits gentle, consistent slopes; stepped works better on steep or uneven terrain.
Racked fence: Panels tilt along the slope, so the top rail runs parallel to the ground. It looks clean up to roughly 15 degrees, but the panel's internal geometry limits how far it can rack before the pickets bind.
Stepped fence: Each panel stays level, and the fence drops in discrete steps between posts. It handles steep, irregular terrain without straining the panel, though the stepped profile is more visible from the street.
| Method | Best For | Look | Difficulty |
|---|---|---|---|
| Racked | Gentle, even slopes | Smooth, follows grade | Moderate |
| Stepped | Steep or uneven terrain | Stair-step profile | Higher |
Fence Company Lincoln has installed both styles across residential and commercial properties, and the choice usually comes down to grade consistency, not preference. Below, we'll show you how to measure your slope and pick the right method before you dig.
How to Assess Slope Angle and Grade Before You Dig
Measure your slope before choosing a method, because grade drives every other decision. Slope grade is the vertical rise divided by the horizontal run, expressed as a percentage or angle. A 10% grade rises 1 foot for every 10 feet of run.
Here's how to measure it:
- Drive two stakes at the high and low points of your fence line.
- Tie a string line between them, pulled tight and level.
- Measure the vertical distance from the string to the ground at the low stake.
- Divide that rise by the horizontal distance between stakes, then multiply by 100.
A rise of 2 feet over 20 feet is a 10% grade, which racks easily; anything steeper than about 25% usually calls for a stepped approach (extension.psu.edu). Walk the full line too, since a slope that changes pitch mid-run often forces a hybrid.
Tools, Materials, and Layout for Building a Fence on a Slope
Gather the right tools before you start, because sloped ground punishes shortcuts. You'll need a post-hole digger or auger, spirit and line levels, a string line, a tape measure, a shovel, and a wheelbarrow for concrete. Materials: posts, panels, concrete mix, gravel for drainage, and exterior-rated fasteners.
Lay out your post spacing first. Standard spacing runs 6 to 8 feet on center, but on a slope you may tighten that to keep panels from racking too far. Mark every post with a stake, then run a string line to confirm the fence stays plumb and the tops align.
- Post-hole digger or power auger
- 4-foot and 2-foot spirit levels
- String line and line level
- Concrete mix and gravel
- Exterior-rated fasteners
Fence Post Depth on Hills: Why Deeper Footings Matter
Fence post depth on hills needs to go deeper than on flat ground, because sloped soil drains faster, shifts more, and exerts uneven lateral pressure on the downhill face of every post. Bury at least one-third of the post's total length, but on a slope the downhill post often needs extra depth to resist the soil pushing against it.
For a standard 8-foot post, that means a hole roughly 2.5 to 3 feet deep (homedepot.com). On steep grades, go deeper, and set every post in concrete rather than packed dirt, since concrete resists the frost heave and lateral movement that make posts lean.
A common mistake is measuring depth from the downhill side only. Measure from the uphill ground line so the post has enough buried length where soil pressure is greatest. Backfill with gravel at the base for drainage, then concrete above it.
The mechanics of why slope footings fail
On flat ground, soil pressure is roughly equal on all sides, so the footing only resists the fence's weight and wind load. On a slope, the uphill soil column is taller and heavier than the downhill column, creating a constant net lateral force pushing the post downhill. Over a few seasons, a footing that was barely adequate on flat ground will rotate and the post will lean.
The fix is not just more concrete. It is more buried length on the uphill side, plus a wider bell at the base so the concrete plug has something to bear against. A straight-sided hole can slide; one that flares at the bottom cannot.
Frost depth and slope exposure
In cold climates, footings must extend below the local frost line, which the International Residential Code addresses through locally adopted frost-depth maps. On a slope, the uphill side of a post is more exposed to freeze-thaw cycling because water drains toward it and pools at the base, so the effective frost depth can exceed the published flat-ground number. Most practitioners add 6 to 12 inches of extra depth on sloped installations in cold regions as cheap insurance.
How post depth interacts with the racked-vs-stepped choice
Post depth is not independent of the installation method. A racked fence needs posts that tolerate the panel's angled load without twisting, so deeper footings matter more. A stepped fence distributes load more evenly under level panels, but step transitions concentrate stress where the height changes. In both cases, the posts at the top and bottom of the run carry the most load and should be deepest.
Local frost depth and footing requirements
Preventing Gaps Under a Fence on a Slope
Preventing gaps under a fence on a slope comes down to how you handle the bottom rail and ground clearance. Gaps appear when panels are set level but the ground drops away beneath them, leaving open space a pet or small animal slips through. The gap decision also affects curb appeal, water movement along the base, and bottom-end maintenance.
The three gap strategies and what each one costs you
Rack the panel so the bottom rail follows the grade, closing the gap naturally. This is the cleanest look on gentle, consistent slopes because the fence line reads as one continuous curve. The trade-off: racking puts the pickets or slats under tension, and beyond roughly 15 degrees the internal geometry binds. Racked fences also tend to have a slightly wavy top line.
Add a kickboard or rot board along the bottom to fill the space and protect the panel from moisture. This is the most common fix on stepped fences because it hides the triangular gap without changing panel geometry. The trade-off is cost and maintenance: the board sits closest to the ground, so it takes the most moisture and rots first. Use a rot-resistant species or composite, and expect to replace it before the rest of the fence.
Step the fence and accept a small triangular gap, then screen it with a board or gravel. This is the cheapest and easiest option, but also the most visible. On a steep slope, the repeated gaps create a sawtooth shadow line that reads as unfinished from the street. Gravel screening helps drainage but does not hide the gap from a side angle.
How gap strategy affects sightlines and curb appeal
The gap decision is really a sightline decision. A racked fence with a tight bottom rail presents a solid visual barrier from the street, which most privacy-focused homeowners want. A stepped fence with open triangular gaps presents a broken line that lets light and sight through at the base. If the fence screens a pool, dog run, or busy road, the gap strategy matters as much as panel height.
A common pattern is to rack on the front-facing run where curb appeal matters and step on the side or back runs where privacy and cost matter more. That hybrid approach is what most experienced installers default to on irregular lots.
Drainage and erosion at the gap
Every gap is a path for water. On a slope, runoff concentrates at the low points of the fence line, and an open gap lets water pass under the fence instead of damming against it. That also means the soil under the gap erodes faster, widening it over time. Armor the gap with gravel or a small riprap apron so water passes without scouring the soil.
If the gap is screened with a rot board, leave a small weep gap at the bottom so water does not pool against the board. A board set flush to the ground will wick moisture and rot from the bottom up.
Pet containment numbers that actually matter
For pet containment, keep ground clearance under 2 inches. For privacy, close gaps completely with a bottom rail that tracks the slope. For drainage, leave at least a half-inch weep gap under any solid bottom board. These goals conflict, so decide which matters most before you build, because retrofitting a gap strategy after the posts are set is expensive.
Step-by-Step Installation: Setting Posts and Panels on a Slope
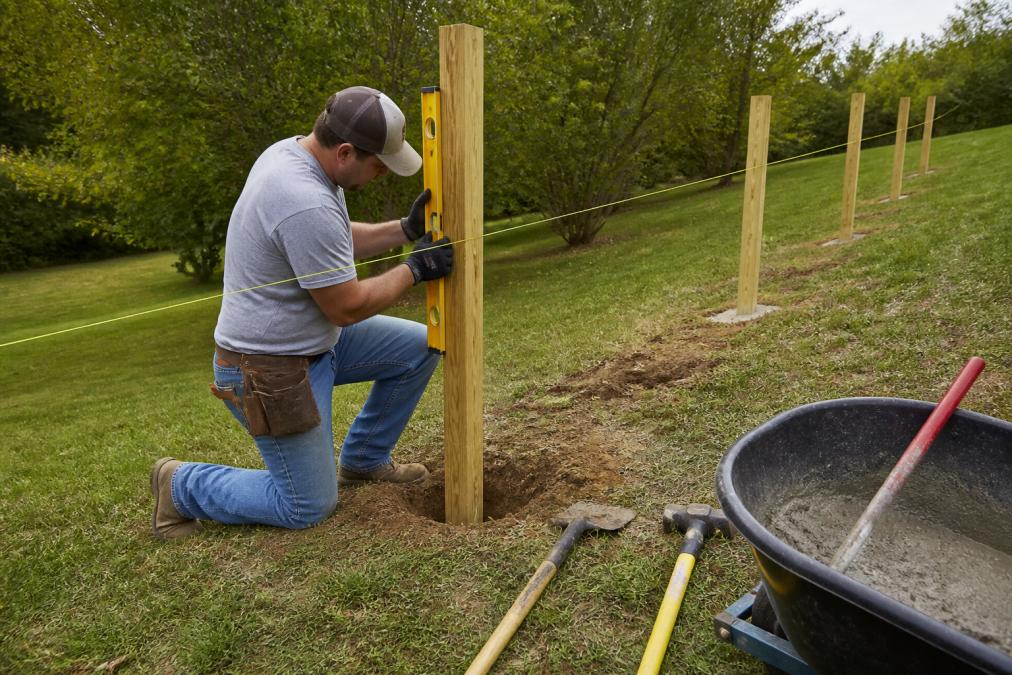
Set your posts first, then hang panels, because plumb and level posts are the foundation for everything else. Work from the highest point down so gravity and drainage stay in your favor.
- Dig the first hole at the high corner. Depth should be one-third of post length plus extra for slope.
- Set the post and check it with a level on two faces. Brace it while the concrete cures.
- Run a string line to the next post location, keeping the line level.
- Dig and set each subsequent post, measuring depth from the uphill ground line.
- Pour concrete around each post and let it cure fully, usually a day or more.
- Attach rails and panels, racking or stepping to match the grade.
- Check plumb and level at every post before fastening panels permanently.
Drainage, Erosion Control, and Long-Term Maintenance for Sloped Fences
Water is the long-term enemy of any fence on a slope, so plan drainage and erosion control before the first post goes in. Sloped ground channels runoff along the fence line, and if water pools at a post base, the footing softens and the post shifts.
Direct runoff away from post bases with gravel backfill and, where needed, a shallow swale or French drain uphill of the fence. On bare slopes, plant ground cover or add mulch to slow erosion. Check the fence after heavy rain for exposed footings or washout.
Maintenance on a slope is mostly about watching the downhill side. Inspect post bases each spring for rot or loosening, tighten fasteners, and re-level any shifted panel. Wood fences near the ground benefit from a rot-resistant bottom board; vinyl and metal need little beyond cleaning.
Conclusion
A sloped yard doesn't rule out a fence, but it does demand the right method, deeper footings, and a drainage plan. Get those three right and the fence holds its line for years instead of leaning by the second season. Fence Company Lincoln brings over 30 years of experience, fully licensed, insured, and bonded crews, and a no-subcontracting approach that keeps one accountable team on your job from design to completion. We install vinyl, wood, chain link, and iron fences built for the terrain, and our price matching policy keeps the value honest. Get started with Fence Company Lincoln and secure your space with a fence that's set deep, set plumb, and built to last.
Frequently Asked Questions
How do you install a fence on sloped ground?
You can rack the panels to follow the slope or step them in level sections. First, measure the grade and set a string line. Then dig post holes deeper on the downhill side, pour concrete footings, and align each post plumb. For racked fences, the top and bottom rails follow the contour; for stepped, each panel is level. Always check local building codes before digging.
What is the difference between racked and stepped fencing?
A racked fence follows the slope angle continuously, so the top and bottom rails stay parallel to the ground. A stepped fence uses level panels that jump down in increments, creating a stair-step look. Racked fences look smoother on gentle grades, while stepped fences handle steeper slopes and are easier to repair because each panel is independent. Your choice depends on slope angle, fence material, and visual preference.
How deep should fence posts be on a hill?
On a slope, posts need to be buried deep enough to resist frost heave and lateral pressure from the slope, which prevents leaning over time. Using concrete footings is recommended.
How do you prevent gaps under a fence on a slope?
Gaps happen when panels are installed level on uneven ground. To prevent them, rack the bottom rail to follow the contour, or add a kickboard or gravel board along the bottom edge. For stepped fences, overlap panels slightly or use a filler piece. Also, grade the soil along the fence line to reduce washouts and keep the bottom rail close to the ground.